

AI Integration Quick Reference
AI Integration Quick Reference
| Field | Value |
|---|---|
| Package | @cometchat/chat-uikit-react-native |
| Framework | React Native CLI |
| Components | CometChatConversations, CometChatUsers, CometChatGroups, CometChatCallLogs, CometChatMessageHeader, CometChatMessageList, CometChatMessageComposer |
| Layout | Tabbed navigation (Chats, Users, Groups, Calls) + message view |
| Prerequisite | Complete React Native CLI Integration Steps 1–4 first |
| Pattern | Full-featured messaging app with multiple sections |
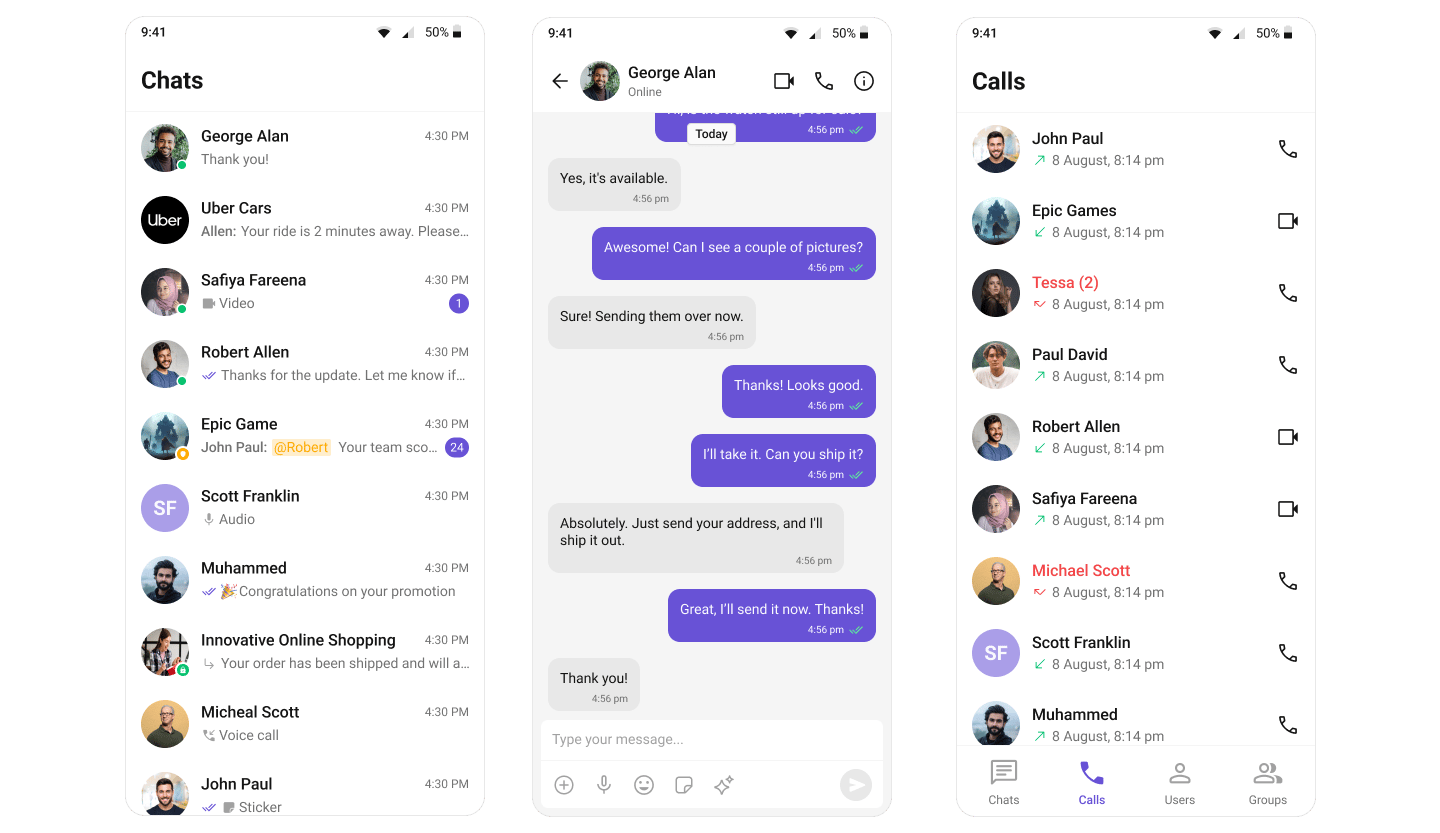
What You’re Building
Three sections working together:- Tab bar — switches between Chats, Users, Groups, and Calls
- List screens — renders the list for the active tab
- Message view — header + messages + composer for the selected item
Prerequisites
Install React Navigation dependencies:npm install @react-navigation/native @react-navigation/bottom-tabs @react-navigation/native-stack
npm install react-native-screens
cd ios && pod install && cd ..
Configure Gesture Handler
Add this import at the very top of your entry file (before any other imports):index.js
import 'react-native-gesture-handler';
This import must be at the top of your entry file. Failing to do so may cause crashes in production.
Step 1 — Create the Tab Screens
Create individual screen components for each tab:- TypeScript
- JavaScript
screens/ConversationsScreen.tsx
import React from "react";
import { View } from "react-native";
import { CometChat } from "@cometchat/chat-sdk-react-native";
import {
  CometChatConversations,
  CometChatUiKitConstants,
} from "@cometchat/chat-uikit-react-native";
import { NativeStackNavigationProp } from "@react-navigation/native-stack";

type Props = {
  navigation: NativeStackNavigationProp<any>;
};

export function ConversationsScreen({ navigation }: Props) {
  const handleItemPress = (conversation: CometChat.Conversation) => {
    const conversationType = conversation.getConversationType();

    if (conversationType === CometChatUiKitConstants.ConversationTypeConstants.user) {
      const user = conversation.getConversationWith() as CometChat.User;
      navigation.navigate("Messages", { user });
    } else {
      const group = conversation.getConversationWith() as CometChat.Group;
      navigation.navigate("Messages", { group });
    }
  };

  return (
    <View style={{ flex: 1 }}>
      <CometChatConversations onItemPress={handleItemPress} />
    </View>
  );
}
screens/UsersScreen.tsx
import React from "react";
import { View } from "react-native";
import { CometChat } from "@cometchat/chat-sdk-react-native";
import { CometChatUsers } from "@cometchat/chat-uikit-react-native";
import { NativeStackNavigationProp } from "@react-navigation/native-stack";

type Props = {
  navigation: NativeStackNavigationProp<any>;
};

export function UsersScreen({ navigation }: Props) {
  const handleItemPress = (user: CometChat.User) => {
    navigation.navigate("Messages", { user });
  };

  return (
    <View style={{ flex: 1 }}>
      <CometChatUsers onItemPress={handleItemPress} />
    </View>
  );
}
screens/GroupsScreen.tsx
import React from "react";
import { View } from "react-native";
import { CometChat } from "@cometchat/chat-sdk-react-native";
import { CometChatGroups } from "@cometchat/chat-uikit-react-native";
import { NativeStackNavigationProp } from "@react-navigation/native-stack";

type Props = {
  navigation: NativeStackNavigationProp<any>;
};

export function GroupsScreen({ navigation }: Props) {
  const handleItemPress = (group: CometChat.Group) => {
    navigation.navigate("Messages", { group });
  };

  return (
    <View style={{ flex: 1 }}>
      <CometChatGroups onItemPress={handleItemPress} />
    </View>
  );
}
screens/CallLogsScreen.tsx
import React from "react";
import { View } from "react-native";
import { CometChatCallLogs } from "@cometchat/chat-uikit-react-native";

export function CallLogsScreen() {
  return (
    <View style={{ flex: 1 }}>
      <CometChatCallLogs />
    </View>
  );
}
screens/ConversationsScreen.js
import React from "react";
import { View } from "react-native";
import {
  CometChatConversations,
  CometChatUiKitConstants,
} from "@cometchat/chat-uikit-react-native";

export function ConversationsScreen({ navigation }) {
  const handleItemPress = (conversation) => {
    const conversationType = conversation.getConversationType();

    if (conversationType === CometChatUiKitConstants.ConversationTypeConstants.user) {
      const user = conversation.getConversationWith();
      navigation.navigate("Messages", { user });
    } else {
      const group = conversation.getConversationWith();
      navigation.navigate("Messages", { group });
    }
  };

  return (
    <View style={{ flex: 1 }}>
      <CometChatConversations onItemPress={handleItemPress} />
    </View>
  );
}
screens/UsersScreen.js
import React from "react";
import { View } from "react-native";
import { CometChatUsers } from "@cometchat/chat-uikit-react-native";

export function UsersScreen({ navigation }) {
  const handleItemPress = (user) => {
    navigation.navigate("Messages", { user });
  };

  return (
    <View style={{ flex: 1 }}>
      <CometChatUsers onItemPress={handleItemPress} />
    </View>
  );
}
screens/GroupsScreen.js
import React from "react";
import { View } from "react-native";
import { CometChatGroups } from "@cometchat/chat-uikit-react-native";

export function GroupsScreen({ navigation }) {
  const handleItemPress = (group) => {
    navigation.navigate("Messages", { group });
  };

  return (
    <View style={{ flex: 1 }}>
      <CometChatGroups onItemPress={handleItemPress} />
    </View>
  );
}
screens/CallLogsScreen.js
import React from "react";
import { View } from "react-native";
import { CometChatCallLogs } from "@cometchat/chat-uikit-react-native";

export function CallLogsScreen() {
  return (
    <View style={{ flex: 1 }}>
      <CometChatCallLogs />
    </View>
  );
}
Step 2 — Create the Messages Screen
- TypeScript
- JavaScript
screens/MessagesScreen.tsx
import React from "react";
import { View } from "react-native";
import { CometChat } from "@cometchat/chat-sdk-react-native";
import {
  CometChatMessageHeader,
  CometChatMessageList,
  CometChatMessageComposer,
} from "@cometchat/chat-uikit-react-native";
import { RouteProp } from "@react-navigation/native";
import { NativeStackNavigationProp } from "@react-navigation/native-stack";

type MessagesRouteParams = {
  Messages: {
    user?: CometChat.User;
    group?: CometChat.Group;
  };
};

type Props = {
  route: RouteProp<MessagesRouteParams, "Messages">;
  navigation: NativeStackNavigationProp<any>;
};

export function MessagesScreen({ route, navigation }: Props) {
  const { user, group } = route.params;

  return (
    <View style={{ flex: 1 }}>
      <CometChatMessageHeader
        user={user}
        group={group}
        onBack={() => navigation.goBack()}
        showBackButton
      />
      <CometChatMessageList user={user} group={group} />
      <CometChatMessageComposer user={user} group={group} />
    </View>
  );
}
screens/MessagesScreen.js
import React from "react";
import { View } from "react-native";
import {
  CometChatMessageHeader,
  CometChatMessageList,
  CometChatMessageComposer,
} from "@cometchat/chat-uikit-react-native";

export function MessagesScreen({ route, navigation }) {
  const { user, group } = route.params;

  return (
    <View style={{ flex: 1 }}>
      <CometChatMessageHeader
        user={user}
        group={group}
        onBack={() => navigation.goBack()}
        showBackButton
      />
      <CometChatMessageList user={user} group={group} />
      <CometChatMessageComposer user={user} group={group} />
    </View>
  );
}
Step 3 — Set Up Navigation
Configure React Navigation with bottom tabs and a stack navigator:- TypeScript
- JavaScript
App.tsx
import React, { useEffect, useState } from "react";
import { Image, StyleSheet } from "react-native";
import { NavigationContainer } from "@react-navigation/native";
import { createNativeStackNavigator } from "@react-navigation/native-stack";
import { createBottomTabNavigator } from "@react-navigation/bottom-tabs";
import { SafeAreaProvider } from "react-native-safe-area-context";
import { GestureHandlerRootView } from "react-native-gesture-handler";
import {
  CometChatUIKit,
  UIKitSettings,
  CometChatThemeProvider,
  CometChatI18nProvider,
} from "@cometchat/chat-uikit-react-native";
import { CometChat } from "@cometchat/chat-sdk-react-native";

import { ConversationsScreen } from "./screens/ConversationsScreen";
import { UsersScreen } from "./screens/UsersScreen";
import { GroupsScreen } from "./screens/GroupsScreen";
import { CallLogsScreen } from "./screens/CallLogsScreen";
import { MessagesScreen } from "./screens/MessagesScreen";

const APP_ID = "APP_ID";
const AUTH_KEY = "AUTH_KEY";
const REGION = "REGION";
const UID = "cometchat-uid-1";

const Tab = createBottomTabNavigator();
const Stack = createNativeStackNavigator();

function TabNavigator() {
  return (
    <Tab.Navigator
      screenOptions={{
        tabBarActiveTintColor: "#6851D6",
        tabBarInactiveTintColor: "#808080",
        headerShown: false,
        tabBarStyle: styles.tabBar,
      }}
    >
      <Tab.Screen
        name="Chats"
        component={ConversationsScreen}
        options={{
          tabBarIcon: ({ color }) => (
            <Image
              source={require("./assets/chats.png")}
              style={[styles.tabIcon, { tintColor: color }]}
            />
          ),
        }}
      />
      <Tab.Screen
        name="Users"
        component={UsersScreen}
        options={{
          tabBarIcon: ({ color }) => (
            <Image
              source={require("./assets/users.png")}
              style={[styles.tabIcon, { tintColor: color }]}
            />
          ),
        }}
      />
      <Tab.Screen
        name="Groups"
        component={GroupsScreen}
        options={{
          tabBarIcon: ({ color }) => (
            <Image
              source={require("./assets/groups.png")}
              style={[styles.tabIcon, { tintColor: color }]}
            />
          ),
        }}
      />
      <Tab.Screen
        name="Calls"
        component={CallLogsScreen}
        options={{
          tabBarIcon: ({ color }) => (
            <Image
              source={require("./assets/calls.png")}
              style={[styles.tabIcon, { tintColor: color }]}
            />
          ),
        }}
      />
    </Tab.Navigator>
  );
}

export default function App() {
  const [loggedIn, setLoggedIn] = useState(false);

  useEffect(() => {
    const init = async () => {
      const uiKitSettings: UIKitSettings = {
        appId: APP_ID,
        authKey: AUTH_KEY,
        region: REGION,
        subscriptionType: CometChat.AppSettings
          .SUBSCRIPTION_TYPE_ALL_USERS as UIKitSettings["subscriptionType"],
      };

      try {
        await CometChatUIKit.init(uiKitSettings);
        await CometChatUIKit.login({ uid: UID });
        setLoggedIn(true);
      } catch (err) {
        console.error("Init/login error:", err);
      }
    };

    init();
  }, []);

  if (!loggedIn) return null;

  return (
    <GestureHandlerRootView style={{ flex: 1 }}>
      <SafeAreaProvider>
        <CometChatI18nProvider>
          <CometChatThemeProvider>
            <NavigationContainer>
              <Stack.Navigator screenOptions={{ headerShown: false }}>
                <Stack.Screen name="Home" component={TabNavigator} />
                <Stack.Screen name="Messages" component={MessagesScreen} />
              </Stack.Navigator>
            </NavigationContainer>
          </CometChatThemeProvider>
        </CometChatI18nProvider>
      </SafeAreaProvider>
    </GestureHandlerRootView>
  );
}

const styles = StyleSheet.create({
  tabBar: {
    backgroundColor: "#FFFFFF",
    borderTopWidth: 1,
    borderTopColor: "#E8E8E8",
    paddingBottom: 5,
    paddingTop: 5,
    height: 60,
  },
  tabIcon: {
    width: 24,
    height: 24,
  },
});
App.js
import React, { useEffect, useState } from "react";
import { Image, StyleSheet } from "react-native";
import { NavigationContainer } from "@react-navigation/native";
import { createNativeStackNavigator } from "@react-navigation/native-stack";
import { createBottomTabNavigator } from "@react-navigation/bottom-tabs";
import { SafeAreaProvider } from "react-native-safe-area-context";
import { GestureHandlerRootView } from "react-native-gesture-handler";
import {
  CometChatUIKit,
  CometChatThemeProvider,
  CometChatI18nProvider,
} from "@cometchat/chat-uikit-react-native";
import { CometChat } from "@cometchat/chat-sdk-react-native";

import { ConversationsScreen } from "./screens/ConversationsScreen";
import { UsersScreen } from "./screens/UsersScreen";
import { GroupsScreen } from "./screens/GroupsScreen";
import { CallLogsScreen } from "./screens/CallLogsScreen";
import { MessagesScreen } from "./screens/MessagesScreen";

const APP_ID = "APP_ID";
const AUTH_KEY = "AUTH_KEY";
const REGION = "REGION";
const UID = "cometchat-uid-1";

const Tab = createBottomTabNavigator();
const Stack = createNativeStackNavigator();

function TabNavigator() {
  return (
    <Tab.Navigator
      screenOptions={{
        tabBarActiveTintColor: "#6851D6",
        tabBarInactiveTintColor: "#808080",
        headerShown: false,
        tabBarStyle: styles.tabBar,
      }}
    >
      <Tab.Screen
        name="Chats"
        component={ConversationsScreen}
        options={{
          tabBarIcon: ({ color }) => (
            <Image
              source={require("./assets/chats.png")}
              style={[styles.tabIcon, { tintColor: color }]}
            />
          ),
        }}
      />
      <Tab.Screen
        name="Users"
        component={UsersScreen}
        options={{
          tabBarIcon: ({ color }) => (
            <Image
              source={require("./assets/users.png")}
              style={[styles.tabIcon, { tintColor: color }]}
            />
          ),
        }}
      />
      <Tab.Screen
        name="Groups"
        component={GroupsScreen}
        options={{
          tabBarIcon: ({ color }) => (
            <Image
              source={require("./assets/groups.png")}
              style={[styles.tabIcon, { tintColor: color }]}
            />
          ),
        }}
      />
      <Tab.Screen
        name="Calls"
        component={CallLogsScreen}
        options={{
          tabBarIcon: ({ color }) => (
            <Image
              source={require("./assets/calls.png")}
              style={[styles.tabIcon, { tintColor: color }]}
            />
          ),
        }}
      />
    </Tab.Navigator>
  );
}

export default function App() {
  const [loggedIn, setLoggedIn] = useState(false);

  useEffect(() => {
    const init = async () => {
      const uiKitSettings = {
        appId: APP_ID,
        authKey: AUTH_KEY,
        region: REGION,
        subscriptionType: CometChat.AppSettings.SUBSCRIPTION_TYPE_ALL_USERS,
      };

      try {
        await CometChatUIKit.init(uiKitSettings);
        await CometChatUIKit.login({ uid: UID });
        setLoggedIn(true);
      } catch (err) {
        console.error("Init/login error:", err);
      }
    };

    init();
  }, []);

  if (!loggedIn) return null;

  return (
    <GestureHandlerRootView style={{ flex: 1 }}>
      <SafeAreaProvider>
        <CometChatI18nProvider>
          <CometChatThemeProvider>
            <NavigationContainer>
              <Stack.Navigator screenOptions={{ headerShown: false }}>
                <Stack.Screen name="Home" component={TabNavigator} />
                <Stack.Screen name="Messages" component={MessagesScreen} />
              </Stack.Navigator>
            </NavigationContainer>
          </CometChatThemeProvider>
        </CometChatI18nProvider>
      </SafeAreaProvider>
    </GestureHandlerRootView>
  );
}

const styles = StyleSheet.create({
  tabBar: {
    backgroundColor: "#FFFFFF",
    borderTopWidth: 1,
    borderTopColor: "#E8E8E8",
    paddingBottom: 5,
    paddingTop: 5,
    height: 60,
  },
  tabIcon: {
    width: 24,
    height: 24,
  },
});
Download tab icons from the CometChat UI Kit assets folder on GitHub and place them in your
assets/ folder.Step 4 — Run the Project
- iOS
- Android
npx react-native run-ios
npx react-native run-android
Next Steps
Theming
Customize colors, fonts, and styles to match your brand
Components Overview
Browse all prebuilt UI components
React Native CLI Integration
Back to the main setup guide
Core Features
Chat features included out of the box